Zombie Bunny is Reader-supported and may earn an affiliate commission through links on our site.

How to Automate Your Stock Photo Submission Process
Learn how to turn your stored photos into a passive income source by utilizing Google Vision and SmugMug to prepare them for Adobe Stock and Shutterstock.
Like many people, we have tons of photos that we have taken over the years. Ranging from all types of subjects, people, and topics. In my quest for another form of passive income with the least amount of work, I set on a quest to monetize these photos with the least amount of effort. To do that I needed to process over 30,000 photos using Google Vision we had stored on SmugMug, curate them to ensure pictures of the family were not posted, and add the necessary metadata to them so they could qualify for Adobe Stock and ShutterStock. Clearly, this was not going to be possible without some sort of automation.

© Copyright , ZombieBunny.Org
First up I needed a way to get all the images and albums from SmugMug. Fortunately, they offer an API to access the albums and images that I wanted to process. In all, I had somewhere north of 35,000 images we had loaded onto SmugMug over the years.
Next up was how to process the files. My first problem was that I didn’t want to include photos with the family in them. Also both Adobe Stock and Shutter Stock require releases for photos of certain types of things, like people and company logos, etc.
I did a bunch of searching and there are a number of businesses that offer AI photo analysis. Many of them did not have any free products, no API or were just plain hard to use. After much searching, I landed on Google Vision. As part of Google Cloud, you can sign up for a free account. Among other things such as server hosting, domain hosting, etc. they offer the use of the Google Vision API.
As I signed up for a free Google Cloud account I was also given $400 in free credit. Also, Google Vision is free to use for every 1000 calls per month / per detention type. This was great because I could use the credits to process the first massive collection of photos we had taken over 30+ years, using the 1000/month free API calls for ongoing photos we take that I plan to upload to the stock sites as well.
Google Vision lets you detect tons of different things in your photos and returns a bunch of metadata about the things you ask it to detect.
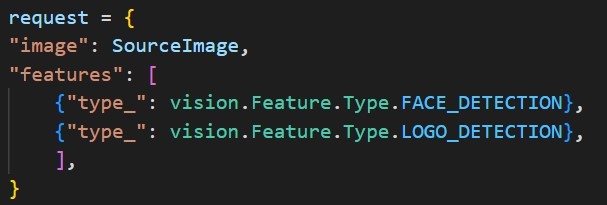
As I mentioned, my first problem is I did not want to eventually upload any family pictures that contain faces or any identifiable company logos. Sure enough, Google Vision to the rescue. I used their face and logo detection and excluded the photo for downstream processing if any face or logo was detected.
© Copyright , ZombieBunny.Org
Of the 35,000 photos, I was still left with 15,000+ that did not contain either pictures of the family in them or any other detectable faces/logs of the public that may have been in our pictures. As I stated before, I was able to get the first 1000 calls free. So I was able to call the face detection 1000 times and the logo detection 1000 times before it began drawing from the free credits I was provided. Even still, Google Vision provides 1000 calls for $1-$2 depending on the detention type used. So processing all 35,000 photos only used $50 of my credit.
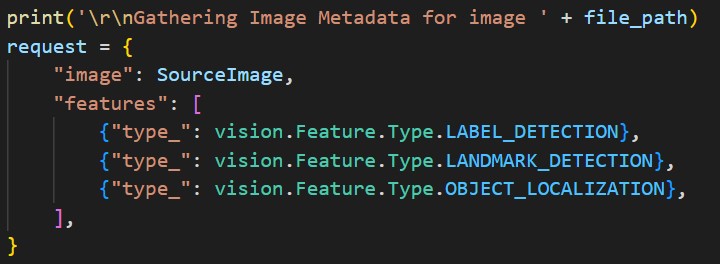
Now I needed to get a title and tag each of the photos that didn’t contain faces or logos. Google Vision had a great way to do that as well. There are a number of things it will detect for you, but I choose the Label and object detection, which basically looked for anything and everything it could figure out, as well as landmark detection as I wanted to use any known locations in my tagging and description.
© Copyright , ZombieBunny.Org
Making this call I was able to get anywhere from a dozen to over 50 keywords for each of my photos. Once I had a list of all the information that Google Vision could find out about my photos, I used that information to set my photo title and tags.
I tried several approaches to this iterative process and finally dialed into the best setting that gave me the best results. In addition, I tried processing these one by one within code where I could just pass the images as a SmugMug URL to Adobe Stock and ShutterStock but I found that downloading one file locally, processing it, and uploading it to the stock sites, then deleting the file and moving onto the next was the best option.
I found that if Google Cloud accessed my SmugMug API directly I would get timeout errors and/or would hit some limit of SmugMug. Given I could process a file at a time and didn’t have to store more than one file on my desktop this was a great option to overcome this limit.
Now it was time to upload the file that was now titled and tagged. I’ll write a post on why I picked Adobe Stock and Shutterstock later and what I found to be good and bad about each, but for the sake of this article and what I automated, these were the two I picked, but I plan to add more.
Each offers a way to FTP the images to your account. In the case of Adobe Stock, this is done via SFTP and for ShutterStock FTP/TLS. Each required slightly different ways in Python to do it, but Python was easily able to connect to each and upload the file once processed on my end.

© Copyright , ZombieBunny.Org

© Copyright , ZombieBunny.Org
Adobe Stock didn’t show the counts as it went, you actually had to click on new and you would see each show up. As you can see from Shutterstock, the 1000’s of photos started coming in. Fully titled and tagged.
One more thing to do before you can submit the photos for consideration. Each site requires that you categorize the photo before submission. In the case of Adobe simply clicking on the photo on the webpage would detect a category. In the case of Shutterstock you can select 100 photos at a time a select from the pre-defined list. I thought about trying to automate this process using Google Vision, but as each has its own predefined categories there was no easy way to do this.
So for ShutterStock, I went through the process, 100 at a time, and selected ones that would share the same category and submitted them. For Adobe, which only simply required that you click on the picture, and detected a category before submission, I used a mouse macro recorder to automate that.
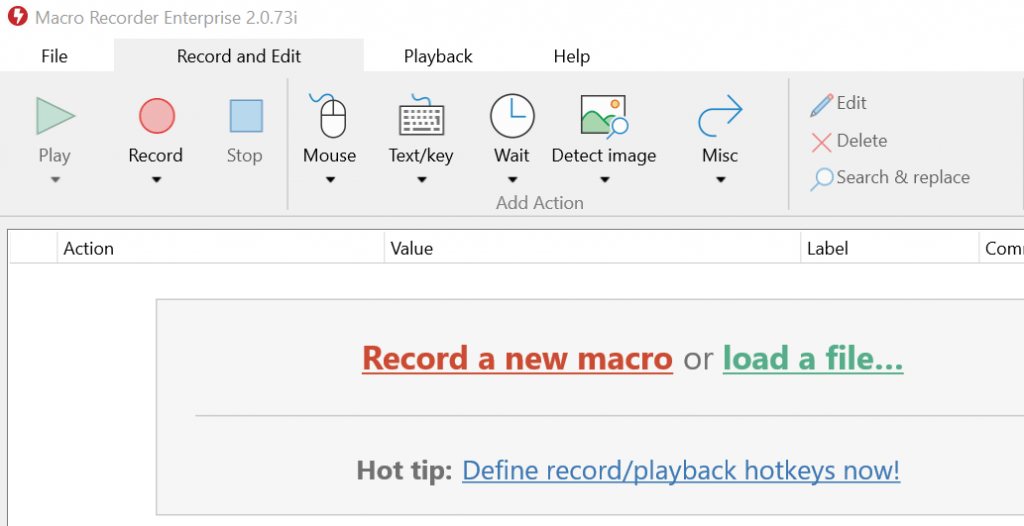
There are many free ones out there if you Google, but I found a paid one called Macro Recorder that was very easy to use and required no coding at all. I simply started recording, selected about 30 photos and clicked through the submission process on Adobe, and asked Macro Recorder to save the clicks.
© Copyright , ZombieBunny.Org
Once I had the macro defined Macro Recorder allows you to set it to run as many times as you want and it will just run. There is a little bit of a trial and error to get it just right so I suggest testing on a few integrations. Once it was working, I set it up to run 5,000 times and ran it overnight. By morning. 15,000 photos were categorized and submitted to Adobe.
In fact, by that next morning, a bunch of them had been reviewed and approved already and I had already made my first sales.

© Copyright , ZombieBunny.Org
I now have my portfolio Adobe Stock and Shutter Stock on both sites. As you can see from the screenshots above, I still have many sitting in a pending review, so more are coming, but the first bunch is starting to get approved. I think at the time of this writing I had over 1,200 approved on Adobe and about 150 on Shutterstock.
Lastly, not all our photos make it to SmugMug. No Problem! I went ahead and extended the code to look at a local folder and any files I drop there follow the same process.
Going forward, we will simply upload our photos to SmugMug, which by the way we love and you can sell your photo there as well, and now I have a script running on my home server once a week and occasionally check in on the stock sites!!!
See the full code on Github
Save 15% off any new SmugMug account when you click this link.
